A year after its 5th June 2023 launch, Diablo 4 is changing things up in a massive manner following its upcoming Vessel of Hatred expansion pack.
According to a recent Blizzard post about the state of the game, Diablo 4 will be updating how leveling up works. The current level 1 to 100 process will be replaced with a new framework; it’ll be a 10-hour sprint this time around as compared to spending 40+ hours to get to 100.
Paragon and character levels are now split out: your character will go from level 1 to 60, and will get an additional 10 skill points for character customization, making it a grand total of 60 just from base leveling alone (originally 50). Once you’re past that, you’ll earn Paragon Levels to unlock Paragon Nodes. For those already at Level 100, character level will be reduced to 50, and all 200 Paragon Points earned will be converted to Realm-wide Paragon Levels.
The key takeaway here is that Paragon Points and Paragon Levels are tied to Realm versus Character Level. So if you’re at Paragon Level 50 for your Druid in one realm, your Necromancer in the same realm will be at Paragon Level 50, with all the benefits that entail. In other words, less grind for Paragon levels and a nice jumpstart for those starting new characters in the same Realm.
“The changes to leveling and Paragon were made with the intent of getting you to endgame activities and gear at a more rapid pace and making it easier to ramp up your alt characters for the fight ahead.”
Other changes to the system include new Difficulty Levels, Torment system, Sacred grade items removed altogether and a big focus on Ancestral, Runewords (requires Vessel of Hatred expansion), and more. In other words, Blizzard is taking the 10-year system from Diablo 3 and implementing it into Diablo 4 bit by bit.
While some current systems in Diablo 4 are great, many action RPG fans do want some of the QoL and overall changes from the previous title and its Seasons. They’ve clearly made the right call, especially if they plan on making Diablo 4 their current action RPG go-to choice for loot hoarders and fans for the next few years or so.
Check them out below:
New Difficulty Systems
World Tiers have been changed to Difficulties, a new way to control your challenge and reward. The first 4 Difficulties—known as Standard Difficulties—are Normal, Hard, Expert, and Penitent. The purpose of Standard Difficulties tiers is to temper your character while you strive to hit character Level 60, the new maximum.
- Normal is a slower-paced mode suited for those looking for a lighter challenge.
- Hard and Expert offer an increased challenge for those looking to test their mettle and play at a faster pace.
- Penitent isn’t for the faint of heart. Those looking to pave a path to the new Torment Difficulties will face off against heightened danger. Play at your own peril!
As you accelerate in Difficulty, the amount of Gold and experience you earn will rise too. Here’s how to unlock each Difficulty:
- Normal and Hard are unlocked by default.
- Expert is unlocked after completing Diablo IV’s prologue.
- Penitent is unlocked upon reaching Level 50.
Monsters will no longer have their level displayed and will scale to the Difficulty you’re playing on.
Torment Difficulties

Making it to the new Torment Difficulties is the mark of a veteran warrior—this is where the endgame truly begins. In Torment Difficulties, your progression is directly linked to the Pit. As you strive to higher Pit Tiers, the Torment Difficulty you have access to will also increase. The higher the Torment Difficulty, the more likely you are to encounter Legendary and Ancestral item drops. Here’s the breakdown of how to unlock each Torment Difficulty:
- Reaching Level 60 unlocks the Pit and Tiers 1–20 of it. Beating Pit Tier 20 unlocks Torment Tier I.
- Beating Pit Tier 35 unlocks Torment II.
- Beating Pit Tier 50 unlocks Torment III.
- Beating Pit 65 unlocks Torment IV.
As if danger wasn’t abundant enough in Sanctuary, Torment Difficulties foster a new hazard: Curses. While playing in Torment Difficulties, your armor and Resistances are reduced as follows:
- Torment 1: -250 Armor and -25% All Resist
- Torment 2: -500 Armor and -50% All Resist
- Torment 3: -750 Armor and -75% All Resist
- Torment 4: -1000 Armor and -100% All Resist
By adding more Difficulties and separating them out in this way, players now have increased choice in how they engage with the risk and reward style of Diablo IV going forward.
Paragon Updates – Glyphs
Glyphs have undergone a metamorphosis to better meld with the other changes we’ve made.
- Upgrading a Glyph is no longer driven by experience. Instead, you’re given attempts to increase your Glyph’s Rank by completing Pit Tiers.
- Three attempts to upgrade your Glyph’s Rank are rewarded for successfully completing the Artificer’s Mastery, and a bonus attempt for not dying.
- Each upgrade attempt can be used to increase any Glyph that isn’t already at max level. The chance to upgrade your Glyph is based on the level of the Glyph and the Tier of the Pit you complete. For example, completing a Pit Tier that is 10 higher than your Glyph’s Rank guarantees an upgrade Rank.
- Completing a Pit Tier that is significantly higher than your Glyph’s current Rank grants bonus upgrade ranks per attempt.
Every 20-level difference between the completed Pit Tier and Glyph Rank grants a bonus upgrade per attempt. Here’s an example of this system in action:
Three deathless Pit Tier 30 runs would take a Glyph all the way up to Rank 19, rapidly unlocking the additional Radius Size increase:
First Pit Run
- Attempt 1: Glyph Rank increases from 1 to 3.
- Attempt 2: Glyph Rank increases from 3 to 5.
- Attempt 3: Glyph Rank increases from 5 to 7.
- Bonus Attempt 4: Glyph Rank increases from 7 to 9.
Second Pit Run
- Attempt 1: Glyph Rank increases from 9 to 11.
- Attempt 2: Glyph Rank increases from 11 to 12.
- Attempt 3: Glyph Rank increases from 12 to 13.
- Bonus Attempt 4: Glyph Rank increases from 13 to 14.
Third Pit Run
- Attempt 1: Glyph Rank increases from 14 to 14 (Radius Size increase).
- Attempt 2: Glyph Rank increases from 15 to 16.
- Attempt 3: Glyph Rank increases from 16 to 17.
- Bonus Attempt 4: Glyph Rank increases from 17 to 18.
The maximum level of a Glyph has been increased from 21 to 100. At Level 45, a Rare Glyph can be upgraded to a Legendary Glyph using Gem Fragments with the following bonuses:
- The Glyph’s Radius Size has increased from 4 to 5.
- The Glyph gains an additional affix.
Paragon Boards

Each Class has received 1 new Paragon Board. These Paragon Boards each come with a new Legendary Node as well. Additionally, only 5 Paragon Boards can be equipped, including your starting board.
The number of Paragon Points that can be earned by leveling has increased from 200 to 300.
Item Quality Rework
Ancestral Items
- Ancestral items start dropping in Torment 1.
- Ancestral items always drop at Item Power 800, the highest possible.
- Greater Affixes only appear on Ancestral items.
- Ancestral items always contain at least 1 Greater Affix.
General
- Sacred Items will no longer drop. Any Sacred Items you have on your character will be marked as ‘Legacy.’ They can continue to be used but cannot be upgraded.
- Non-Ancestral items are capped at Item Power 750. Legendary items dropped when you’re Level 60 will always be Item Power 750.
- Item Power 750 items can now be Masterworked up to 4 times.
- Because Character Levels are being re-adjusted in the new Realm-wide Paragon system, items with Item Power over 540 are being adjusted to 540. Affixes on these adjusted items will be rerolled at the highest values in their respective ranges.
1 New Skill For Each Class
Martial experts in Sanctuary have developed new techniques to vanquish darkness. Now you must learn them for yourself. Each of these Skills uncovers a new direction to take your Class build.
Barbarian
- Mighty Throw [Weapon Mastery Skill, 12 Second Cooldown]: Hurl your weapon, dealing 60% Weapon damage upon impact and sticking in the ground. While in the ground, your weapon pulses and deals 20% Weapon damage every second for 4 seconds.
- Enhanced Mighty Throw: While a thrown weapon is out, gain 25%[+] increased Attack Speed.
- Fighter’s Mighty Throw: Swapping weapons near any of your thrown weapons creates an additional pulse. Each extra pulse generates 3% of your Maximum Life as a Barrier for 5 seconds.
- Warrior’s Mighty Throw: Mighty Throw’s impact deals 200%[x] increased damage and Stuns enemies for 2 seconds.
Druid
- Stone Burst [Earth Core Skill, 30 Spirit Cost]: Gather stones beneath your enemies then detonate them dealing 80% Weapon damage. Channeling deals 20% Weapon damage and increases the size of the affected area, up to a 400% increase after 1.0 seconds.
- Enhanced Stone Burst: Stone Burst’s final explosion damage is increased by 25%[x] within the initial radius.
- Primal Stone Burst: While Channeling Stone Burst, and for 2 seconds after it ends, gain 30%[+] Attack Speed.
- Raging Stone Burst: Stone Burst costs 66%[x] more Spirit, and its final explosion deals 50%[x] more damage.
Necromancer
- Soulrift [Darkness Ultimate Skill, 50 Second Cooldown]: Corrupt nearby enemies for 8 seconds, dealing 65% Weapon damage per second. Every 0.25 seconds, rip out and absorb the soul of an enemy, generating 2 Essence and granting a Barrier for 2% of your Maximum Life for 5 seconds.
- Supreme Soulrift: Every soul absorbed increases your damage by 1%, up to 30%. This bonus persists for 5 seconds after Soulrift ends.
- Prime Soulrift: Enemies with their souls ripped out become Vulnerable for 2 seconds. Damaging enemies affected by Soulrift has a 5% chance for their souls to be ripped out and absorbed.
Rogue
- Dance of Knives [Cutthroat Agility Skill, 6 Charges, 1 Second Charge Cooldown]: While Channeling, gain 20%[+] increased Movement Speed, 10%[+] Dodge chance, and launch knives at nearby enemies, each dealing 42% Weapon damage.
- Enhanced Dance of Knives: Moving 30 meters while Channeling Dance of Knives grants 4 Charges.
- Methodical Dance of Knives: When you stop Channeling Dance of Knives, drop up to 12 Stun Grenades, each dealing 20% Weapon damage. The Channeled duration determines how many are dropped.
- Disciplined Dance of Knives: Dance of Knives Slows enemies hit by 25% for 3 seconds. Each Knife has a 20% chance to pierce the enemy.
Sorcerer
- Familiar [Conjuration Skill, 3 Charges, 12 Second Charge Cooldown]: Summon a Familiar of the element of your last cast Skill for 8 seconds. The Familiar chases enemies and periodically explodes, dealing 40% of its element’s damage in an area. You may have 6 Familiars summoned at a time.
- Enhanced Familiar: Familiar passively applies an effect to nearby enemies, based on their element. Fire Familiar: Applies 94% Burning damage to enemies. Cold Familiar: Applies 15% Chill to enemies. Lightning Familiar: Stuns enemies for 1 second.
- Summoned Familiar: While you have two or more different element Familiars summoned, gain 3% Damage Reduction. Familiar Element is no longer tied to your previous cast skill. Instead, the Familiar Element progresses in sequence. The sequence is Fire to Cold, Cold to Lightning and Lightning to Fire.
- Invoked Familiar: While a Familiar is active, gain 10%[x] increased damage to skills that deal its damage type.
5 New Passives For Each Class
Barbarian
- Belligerence: Damaging an enemy with a Basic Skill increases your damage by 3/6/9% for 4 seconds.
- Heavy Hitter: Your Ultimate Skills deal 15/30/45% more damage.
- Warpath: After Overpowering, you deal 4% increased damage for 4 seconds.
- Irrepressible: Casting a Weapon Mastery Skill Fortifies you for 10% of your Maximum Life.
- Barbed Carapace [Key Passive]: For every 25 Fury you spend, you gain 10%[+] Thorns for 8 seconds, up to 120%. Casting a Skill with a Cooldown grants you Unhindered for 5 seconds. During this time, you deal 100% of your Thorns as physical damage to Close enemies every second.
Druid
- Humanity: You deal 5/10/15%[x] more damage while in Human form.
- Catastrophe: You deal 5/10/15%[x] more damage for 8 seconds after casting an Ultimate skill.
- Feral Aptitude: You deal 3%[x] increased damage while Healthy and 3%[x] increased damage while above 100% Movement Speed. These bonuses can stack.
- Backlash: You deal 4%[x] increased damage for 5 seconds after casting a Defensive Skill.
- One with Nature [Key Passive]: Your Companion Skills each gain 1 additional companion and deal 50%[x] increased damage. Gain the Passive Effect of Ravens, Wolves and Poison Creeper.
Necromancer
- Necrotic Fortitude: Lucky Hit: Your damage has up to a 5/10/15% chance to grant a Barrier for 5% of your Maximum Life for 6 seconds.
- Finality: You deal 5/10/15%[x] increased damage for 8 seconds after casting an Ultimate Skill.
- Titan’s Fall: While Fortified you deal 6/12/18%[x] increased damage to Elites.
- Precision Decay: Your Lucky Hit chance is increased by 5/10/15%[+].
- Affliction [Key Passive]: Enemies affected by Vulnerable, Crowd Control, or Shadow Damage over Time are infected with Affliction and take 15%[x] increased damage from you and your Minions. Your Curse Skills deal 80%(Weapon Damage) Shadow damage to enemies that have Affliction. This amount increases by 30%[x] of your damage to Crowd Control, Vulnerable, and Shadow Damage over Time combined.
Rogue
- Target Practice: Your Critical Strike Chance with Marksman and Cutthroat Skills is increased by 3/6/9%.
- Balestra: Gain 4/8/12% increased Damage for 4 seconds after using Evade.
- Evasive: After Dodging an attack, gain 2/4/6% Damage Reduction for 4 seconds.
- Unto Dawn: Your Ultimate skills deal 15/30/45%[x] increased damage.
- Alchemical Admixture [Key Passive]: Dealing 3 different types of non-physical damage increases the Potency of your Imbuement skills by 40% for 5 seconds. This Potency is further increased by 20% of the total amount of your Bonus Damage to Poison, Shadow, and Cold.
Sorcerer
- Evocation: Gain 4% Cooldown Reduction.
- Energy Focus: You generate a 6 second Barrier for 0.5/1.0/1.5% of your Maximum Life every second up to 30%. This effect is lost for 5 seconds after losing health.
- Dampen Layer: You gain 2/4/6% Damage Reduction while you have an active Barrier.
- Elemental Synergies: Your Frost, Shock, and Pyromancy damage is increased by 1/2/3%[x] for each skill you have equipped of that type.
- Enlightenment [Key Passive]: Casting any Skill grants 1 stack of Enlightenment, or grants 15 if your previous cast Skill was a different Element. After gaining 100 stacks, you become Enlightened, can no longer gain stacks, and lose 10 stacks per second. While Enlightened, your Bonus Damage with Fire, Lightning and Cold are equal to them combined and you gain:
- 25%[x] increased damage
- 45%[+] Mana Regeneration
- 20%[+] Attack Speed
Runewords
Runewords are a way to take your character’s power to a new level by creating your own abilities. There are two types of Runes you’ll find in Sanctuary: Ritual and Invocation. Runes of Ritual specify actions you must take to trigger them…

and Runes of Invocation grant a powerful effect when you meet said trigger.

Having both the Bac and Jah Runes equipped to an item you’re wearing created the BacJah Runeword. It also means that every time your character travels 5 meters, they will generate 50 Offering. Once they have generated at least 500 Offering, their next Evade is replaced with the Sorcerer’s Teleport.
Runewords can give you access to Skills from other Classes. They can also do things like temporarily increase your Movement Speed, Skills, and more. There are 17 Runes of Ritual and 28 Runes of Invocation available. With a multitude of ways to pair them, the sky’s the limit. Here are the tooltips for all 45 Runes:
Ritual Runes:
- Yul, Legendary:
- Gain: 50 Offering.
- Cast a Skill with a Cooldown.
- Cir, Magic:
- Gain: 25 Offering.
- Cast the same non-Channeled Skill 3 times in a row.
- Ahu, Legendary:
- Gain: 10 Offering.
- Lucky Hit: Up to a 100% chance against Injured enemies.
- Neo, Rare:
- Gain: 300 Offering.
- Deal damage after not taking any within 5 seconds. (Resets if Invulnerable.)
- Tam, Legendary:
- Gain: 25 Offering.
- Cast a non-Channeled Core Skill.
- Xol, Legendary:
- Gain: 150 Offering.
- Evoke power from another Class.
- Zan, Magic:
- Gain: 150 Offering.
- Cast an Ultimate Skill.
- Feo, Rare:
- Gain: 1000 Offering.
- Become Injured or Crowd Controlled (Cooldown: 20 seconds).
- Noc, Rare:
- Gain: 5 Offering.
- Inflict a Crowd Control that isn’t Slow or Chill.
- Cem, Magic:
- Gain: 50 Offering.
- Cast Evade.
- Bac, Legendary:
- Gain: 50 Offering.
- Travel 5 meters.
- Ur, Magic:
- Gain: 10 Offering.
- Your Minion or Companion kills an enemy or dies.
- Yax, Magic:
- Gain: 100 Offering.
- Drink a Healing Potion.
- Poc, Rare:
- Gain: 2 Offering.
- Spend 5% of your Maximum Resource.
- Moni, Magic:
- Gain: 10 Offering.
- Cast a Skill after moving. (Cooldown: 0.2 seconds)
- Kaa, Rare:
- Gain: 2 Offering.
- Lose 1% of your Maximum Life.
- Lith, Legendary:
- Gain: 25 Offering.
- Stand still for 0.3 seconds.
Invocation Runes:
- Lac, Rare:
- Requires: 800 Offering (Overflow: Increased Duration). Cooldown: 1 Second.
- Evoke the Barbarian’s Challenging Shout, reducing your damage taken.
- Ohm, Legendary:
- Requires: 500 Offering (Overflow: Increased Duration). Cooldown: 2 Seconds.
- Evoke the Barbarian’s Enhanced War Cry, increasing your Movement Speed and damage dealt.
- Vex, Legendary:
- Requires: 400 Offering (Overflow: Increased Duration). Cooldown: 1 Second.
- Gain +3 to all Skills for 5 seconds.
- Gar, Magic:
- Requires: 25 Offering (Overflow: Gain Multiple Stacks). Cooldown: 1 Second.
- Gain 2.5% Critical Strike Chance for 5 seconds, up to 25%.
- Xan, Legendary:
- Requires: 700 Offering Cooldown: 1 Second.
- Your next Skill cast will be a guaranteed Critical Strike and Overpower.
- Que, Rare:
- Requires: 800 Offering (Overflow: Increased Duration) Cooldown: 1 second.
- Evoke the Druid’s Earthen Bulwark, granting yourself a Barrier.
- Yom, Legendary: Requires:
- 500 Offering Cooldown: 5 Seconds.
- Evoke the Druid’s Petrify, Stunning enemies and increasing your Critical Strike Damage against them.
- Eom, Legendary:
- Requires: 100 Offering (Overflow: Further Reduced Cooldowns) Cooldown: 1 Second.
- Reduce your active Cooldowns by 0.25 seconds.
- Lum, Magic:
- Requires: 5 Offering (Overflow: Increased Resource Restored) Cooldown: 1 Second.
- Restore 1 Primary Resource.
- Qua, Rare: Requires:
- 400 Offering (Overflow: Increased Duration) Cooldown: 1 Second.
- Restore an Evade charge and gain 6% Movement Speed for 5 seconds, up to 30%.
- Xal, Rare:
- Requires: 200 Offering (Overflow: Increased Duration) Cooldown: 1 Second.
- Gain 20% Maximum Life for 4 seconds.
- Wat, Rare:
- Requires: 100 Offering Cooldown: 1 Second.
- Evoke the Necromancer’s Horrid Decrepify, Slowing enemies, reducing their damage, and letting you Execute them.
- Teb, Magic:
- Requires: 100 Offering Cooldown: 1 Second.
- Evoke the Necromancer’s Abhorrent Iron Maiden, counterattacking damage from enemies and Healing you when they die.
- Qax, Rare:
- Requires: 400 Offering (Overflow: Further Increased Damage) Cooldown: 1 Second.
- Your next non-Basic Skill cast spends all of your Primary Resource to deal up to 100% increased damage.
- Zec, Rare:
- Requires: 200 Offering (Overflow: Further Reduced Cooldown) Cooldown: 2 Seconds.
- Reduce your active Ultimate Cooldown by 4 seconds.
- Ner, Rare:
- Requires: 700 Offering (Overflow: Increased Duration) Cooldown: 6 Seconds.
- Evoke the Rogue’s Countering Concealment, gaining Dodge Chance, Movement Speed, Unstoppable, and Stealth.
- Mot, Rare:
- Requires: 150 Offering (Overflow: Gain Multiple Shadows) Cooldown: 1 Second.
- Gain a shadow from the Rogue’s Dark Shroud, reducing damage taken per shadow.
- Jah, Legendary:
- Requires: 500 Offering Cooldown: 2 Seconds.
- Replace your next Evade with the Sorcerer’s Teleport, blinking further, dealing damage, and becoming Unstoppable.
- Thul, Rare:
- Requires: 400 Offering (Overflow: Increased Size) Cooldown: 1 Second.
- Evoke the Sorcerer’s Mystical Frost Nova, inflicting Freeze and Vulnerable onto enemies.
- Tzic, Rare:
- Requires: 250 Offering Cooldown: 1 Second.
- Evoke the Spiritborn’s Concussive Stomp, dealing damage and Knocking Down enemies.
- Kry, Rare:
- Requires: 500 Offering Cooldown: 3 Seconds.
- Evoke the Spiritborn’s Vortex, dealing damage and Pulling In enemies.
- Ono, Magic:
- Requires: 25 Offering (Overflow: Increased Bolts Spawned) Cooldown: 1 Second.
- Evoke the Druid’s Dancing Bolts, seeking and dealing damage to enemies.
- Tec, Magic:
- Requires: 100 Offering (Overflow: Increased Size) Cooldown: 1 Second.
- Evoke the Barbarian’s Earthquake, dealing damage to enemies within.
- Met, Magic:
- Requires: 100 Offering (Overflow: Increased Duration) Cooldown: 1 Second.
- You leave the Necromancer’s Desecrated Ground behind you for 3 seconds, dealing damage to enemies within.
- Tun, Magic:
- Requires: 100 Offering (Overflow: Increased Grenades Spawned) Cooldown: 1 Second.
- Evoke the Rogue’s Stun Grenades, Stunning and dealing damage to enemies.
- Ton, Magic:
- Requires: 25 Offering (Overflow: Increased Meteorites Spawned) Cooldown: 1 Second.
- Evoke the Sorcerer’s Meteorites, dealing damage to enemies.
- Tal, Magic:
- Requires: 100 Offering (Overflow: Increased Swarms Spawned) Cooldown: 1 Second.
- Evoke the Spiritborn’s Pestilent Swarm, dealing damage to enemies.
- Ceh, Magic:
- Requires: 100 Offering (Overflow: Summon Multiple Wolves) Cooldown: 1 Second.
- Summon a Spirit Wolf to attack enemies for 8 seconds.
Keep these aspects about Runes in mind:
- They are tradeable.
- Runes stack and will be stored in a new socketable inventory tab.
- A maximum of 2 Runewords can be equipped (4 Runes total).
- The same Rune cannot be equipped twice.
Rune Crafting
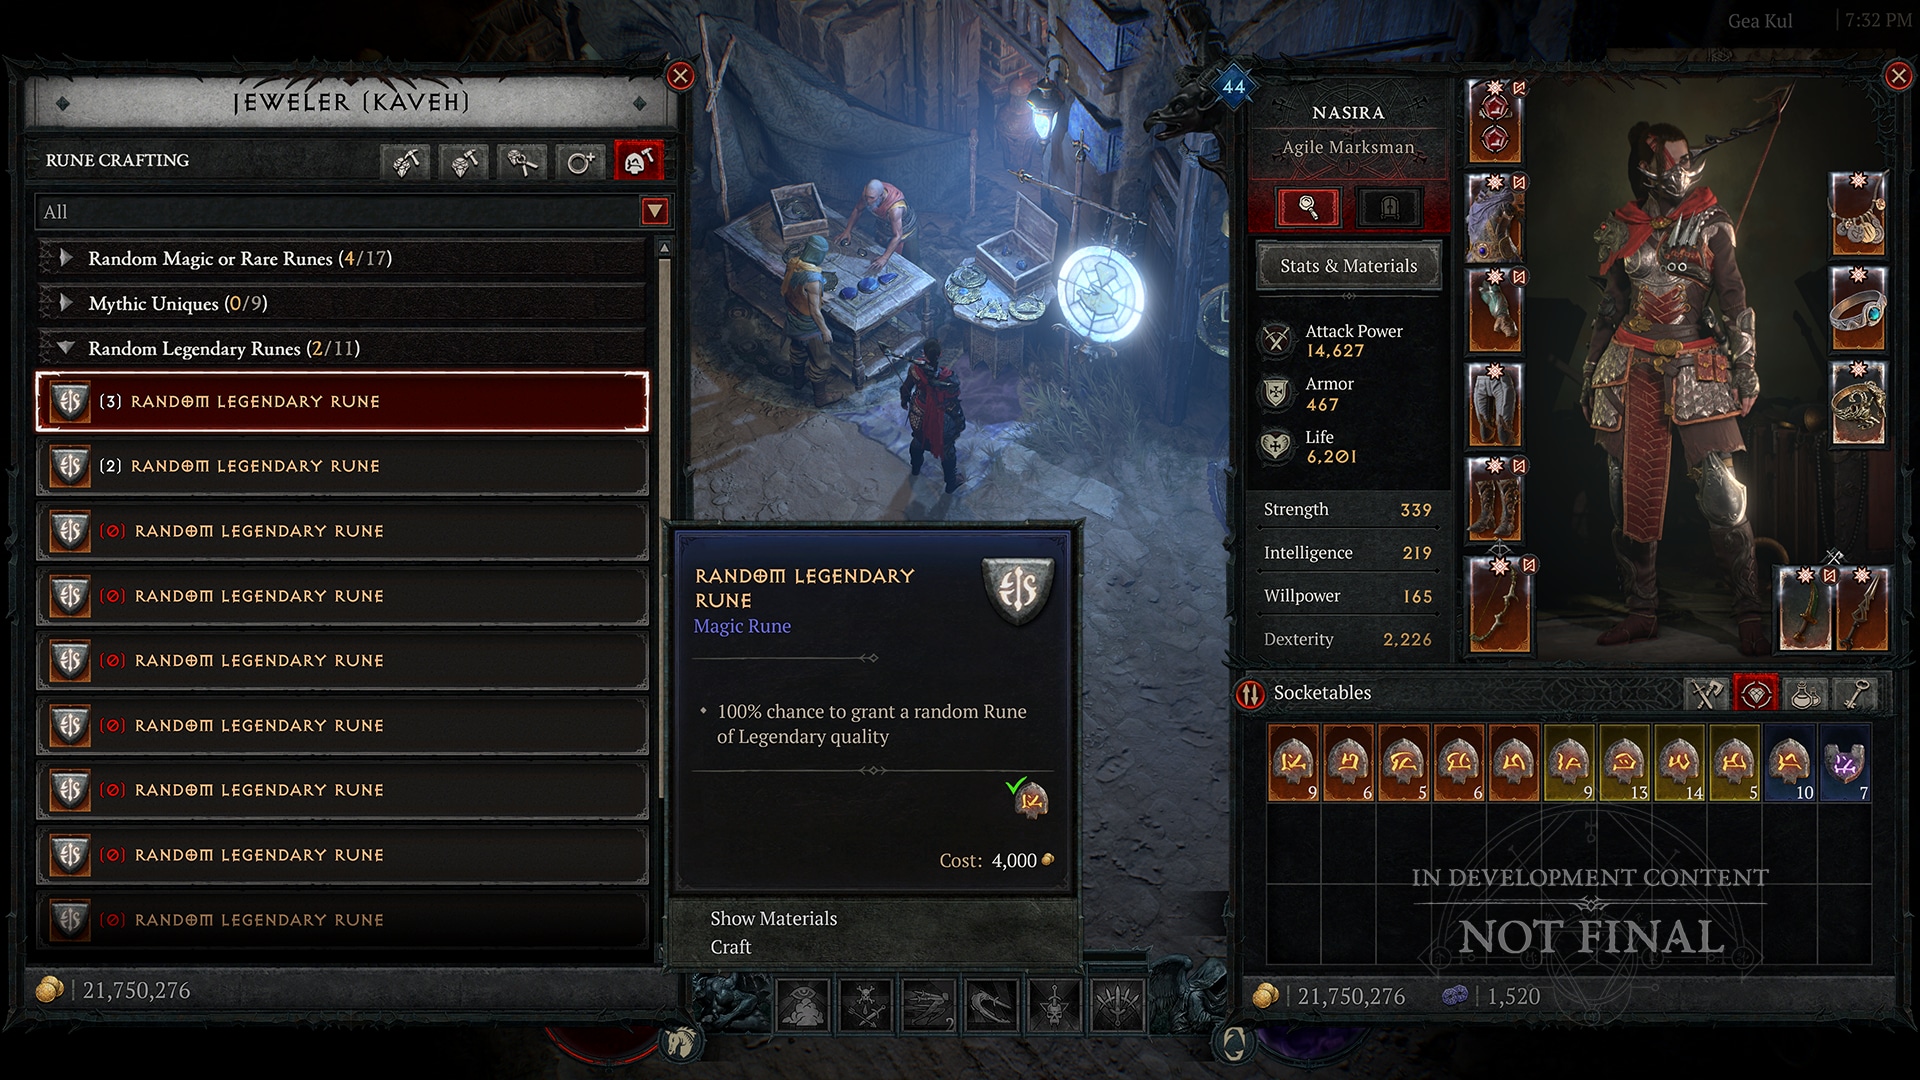
Runes can be used to craft other Runes.
- You can use 3 Runes with the same name to craft a new Rune. The Rune created from crafting is guaranteed to be different than the ones used.
- When non-Legendary Runes are used to craft, there is a chance to create a Rune of the next highest rarity.
Runes can also be used to craft Mythics at the Jeweler.
- Each one requires: 1 Resplendent Spark, 10 Legendary Runes of a specific name, 10 Rare Runes of a specific name, and 10 Magic Runes of a specific name to craft.


 ">
">